Precio FOB
Obtener el precio más reciente|
- Minimum Order
País:
China
N º de Modelo:
-
Precio FOB:
Lugar de origen:
-
Precio de pedido mínimo:
-
Cantidad de pedido mínimo:
-
Detalle de embalaje:
-
El tiempo de entrega:
-
Capacidad de suministro:
-
Tipo de pago:
-
Grupo de productos :

China
Persona de contacto Mr. Wilson
6-703, FUYUAN COMMUNITY, YUFU ROAD, LONGGANG DISTRICT, SHENZHEN, CHINA, Muping, Sichuan
Character
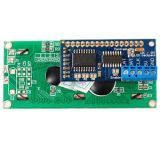
LCD Shield Module With LCD***2 -Arduino Compatible
LCD backpacks reduce the number of pins needed to
connect to an LCD. LCDs are a fun and easy way to have your
microcontroller project talk back to you. Character LCDs are
common, and easy to get, available in tons of colors and sizes. (or
similar microcontroller) but find that the number of pins necessary
to control the LCD can be restrictive, especially with ambitious
projects. We wanted to make a 'backpack' (add-on circuit) that
would reduce the number of pins without a lot of expense.
By using simple I2c and SPI /output expanders
we have reduced the number of pins (only 2 pins are needed for I2c)
while still making it easy to interface with the LCD. For Arduino
users, we provide a easy-to-use library that is backwards
compatible with projects using the '6 pin' wiring.
This backpack will work with any 'standard'
character LCD, from 8X1 to *0X4 sizes! As long as they have a
**-pin single-line connection header at the top. We carry a few
LCDs that work great.
For advanced users,
this project can be used for general purpose I/O expansion, the
MCP****8 has 8 I/o pins (7 are connected) with optional pull-UPS,
the SPI *4HC**5 has 7 connected outputs.
LCDs are a fun and easy way to have your microcontroller
project talk back to you. Character LCDs are common, and easy to
get, available in tons of colors and sizes. We've written tutorials
on using character LCDs with an Arduino (or similar
microcontroller) but find that the number of pins necessary to
control the LCD can be restrictive, especially with ambitious
projects. We wanted to make a 'backpack' (add-on circuit) that
would reduce the number of pins without a lot of
expense.
By using simple I2c and SPI /output
expanders we have reduced the number of pins (only 2 pins are
needed for I2c) while still making it easy to interface with the
LCD. For Arduino users, we provide a easy-to-use library that is
backwards compatible with projects using the '6 pin' wiring.
For advanced users, this project can be used for
general purpose I/O expansion, the MCP****8 has 8 I/o pins (7 are
connected) with optional pullups, the SPI *4HC**5 has 7
outputs.
Which LCD to use:
This backpack will work with any 'standard'/'classic'
character LCD. It does not work with graphic LCDs. Character LCDs
come in sizes ranging from 8X1 (8 characters, one line) to *0X4 (*0
characters, four lines). The backpack will also only fit LCDs that
have a single line of pins at the top, not the ones that have a
2X*0 or 2X8 connector on the side. Those are much rarer these days
but just keep a look out for that!
Assembly:
Putting together the backpack
onto an LCD is a quick process, and should take only a few minutes
with a soldering iron.
Parts check:
Verify you have everything in the bag, there
should be an assembled and tested PCB, a *-pin and *-pin 3.5mm
terminal block. The backpack does not come with header or an
LCD.
Terminal blocks:
The terminal blocks allow you to easily attach and remove the
LCD from your wiring, which we think is awfully handy. If you dont
want the terminal blocks (they stick out a bit) you can always skip
this step.
The terminal blocks come in 2 and
*-pin pieces. Slide them together.
Place the
blocks over the corner area of the backpack so that the holes stick
out (unless for some reason you want them to face the other
way)
Solder them into place
Attach LCD:
Now we will
attach the backpack. We will show how to do this in a permanent
fashion. If you think you would like to remove and replace the LCD
at some time, you can use a piece of **-pin long 0.1"
female header as a socket but be aware it will stick out a
lot.
There are two options, you can tuck the backpack
behind the LCD
| País: | China |
| N º de Modelo: | - |
| Precio FOB: | Obtener el precio más reciente |
| Lugar de origen: | - |
| Precio de pedido mínimo: | - |
| Cantidad de pedido mínimo: | - |
| Detalle de embalaje: | - |
| El tiempo de entrega: | - |
| Capacidad de suministro: | - |
| Tipo de pago: | - |
| Grupo de productos : | arduino board and accessories |


X480 TFT Panel with 24-bit Parallel RGB Interface 250nits Screen")


